Migrate subscription preferences
You may have managed your audience’s subscription preferences manually—with your own attributes in a system outside of Customer.io. Before you use our subscription center feature, you probably want to migrate your audience’s preferences to the cio_subscription_preferences attribute, so that your audience’s preferences still apply when you enable the subscription center.
This page is about migrating subscription preferences—the topics a person wants (or does not want) to get messages about. These steps will not affect your audience’s global subscription preference—which determines whether a person is eligible to receive most messages.
How it works
If you used to manage subscription preferences outside our subscription center feature, or you set up new “opt-in” topics, you’ll want to apply people’s current preferences to the cio_subscription_preferences attribute.
This ensures that you continue to observe your audience’s preferences when you enable the subscription center feature in Customer.io.
To migrate your audience’s preferences, we’ll:
- Create a segment of people who have subscription preference attributes
- Use this segment as a campaign trigger
- In the campaign, use a Create or Update Person action to set current preferences as topics in the
cio_subscription_preferencesobject.
The subscription preferences attribute
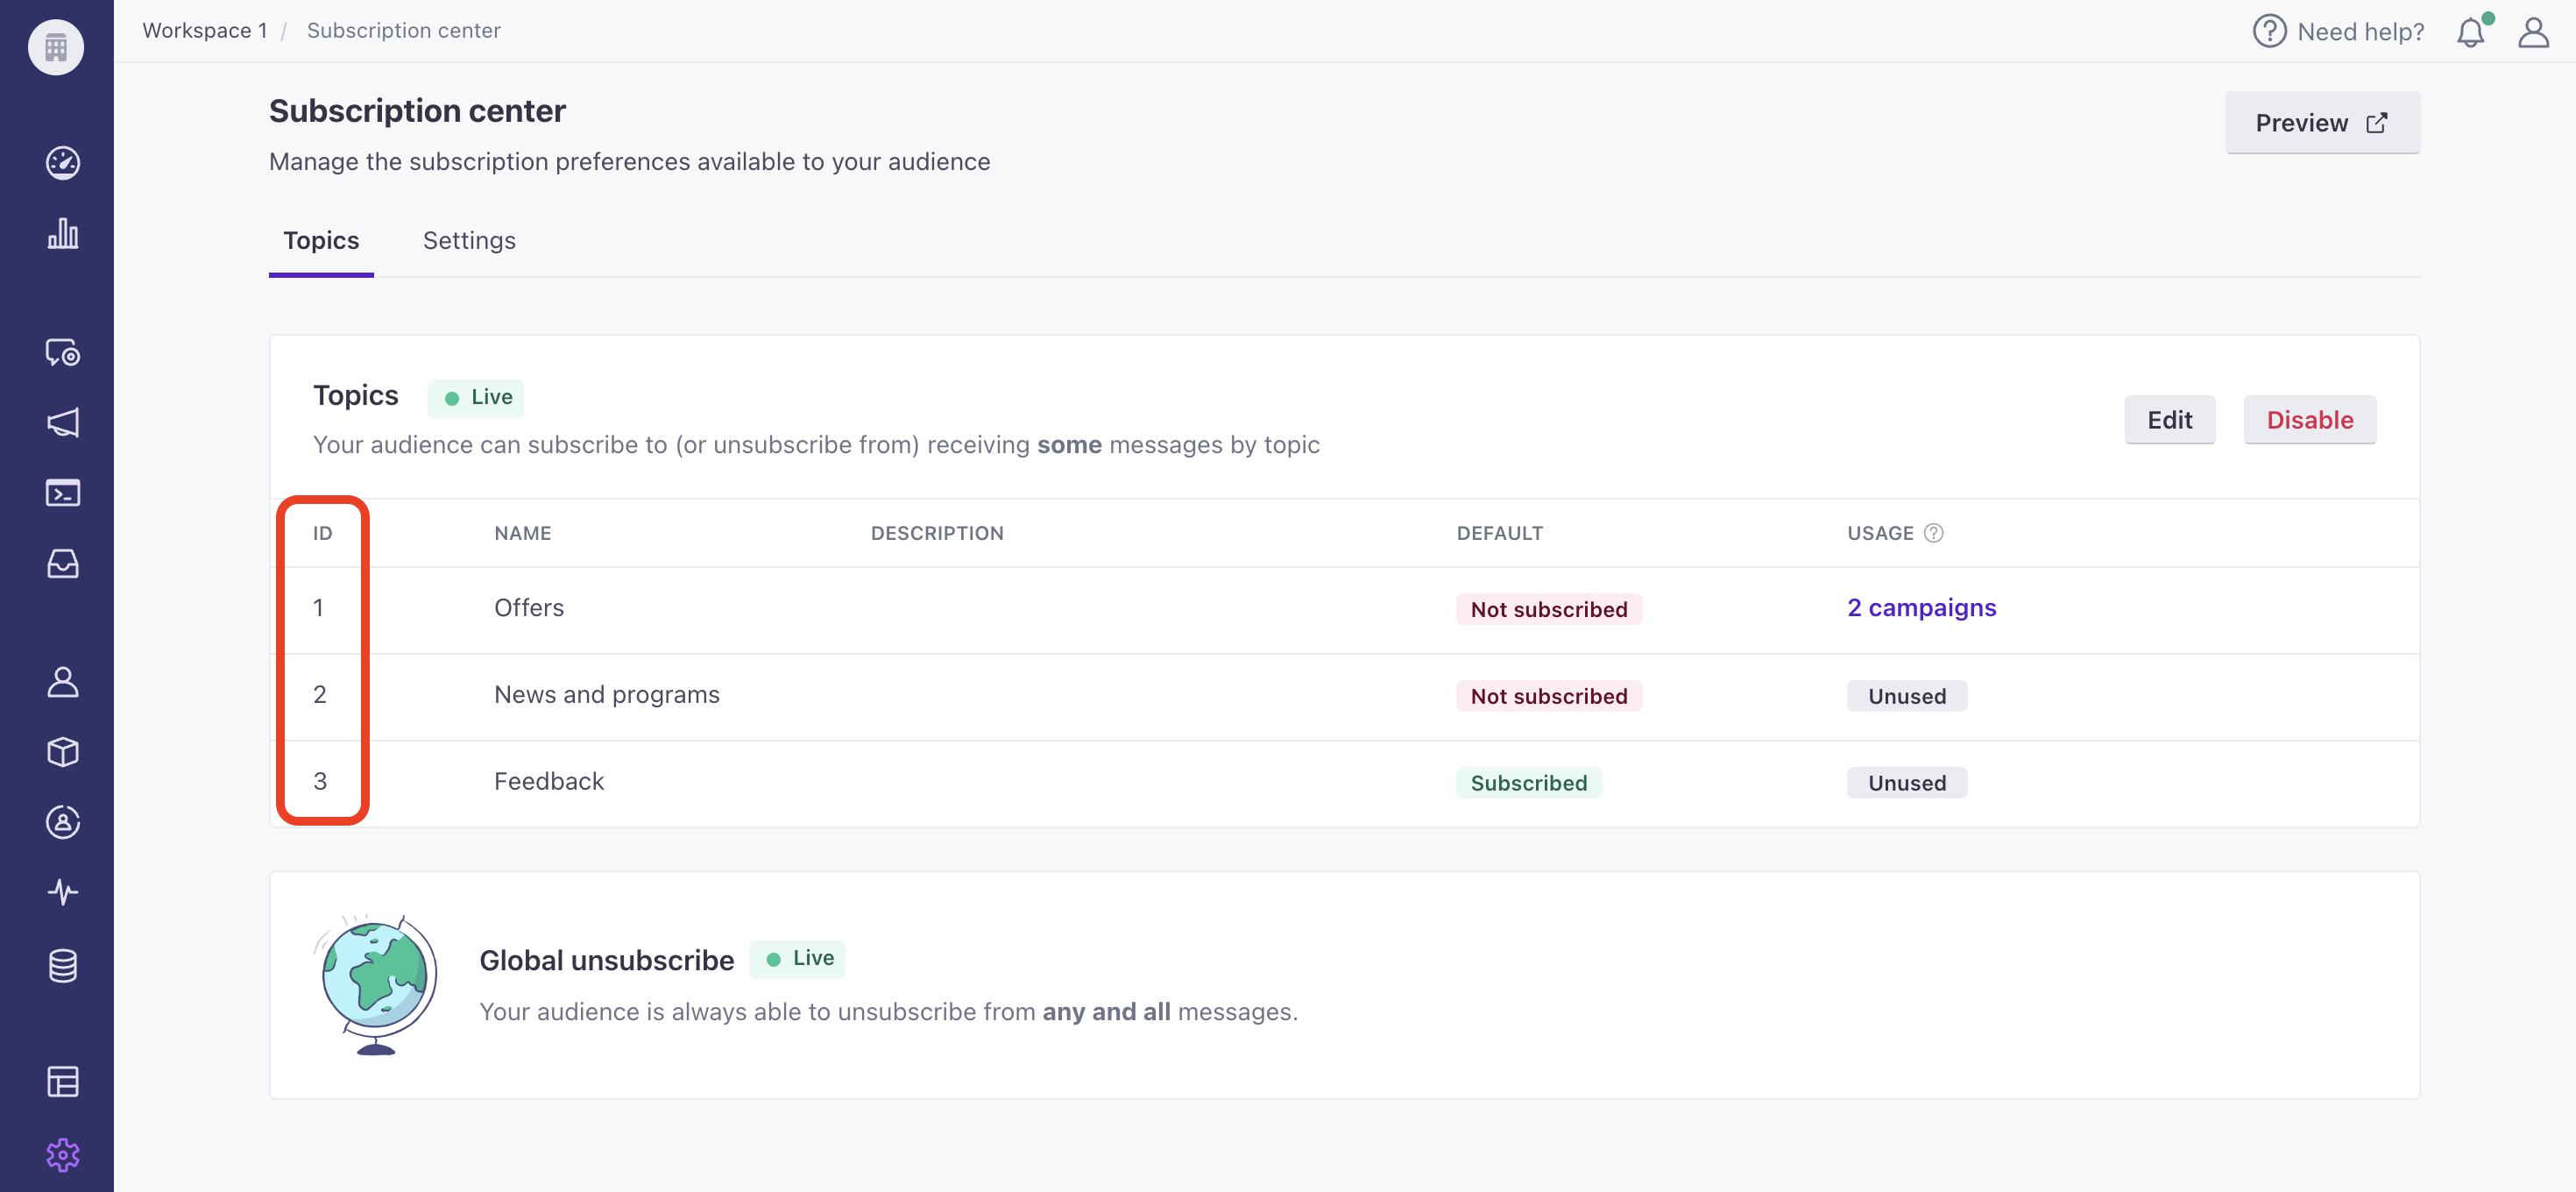
You can set your audience’s subscription preferences using the reserved cio_subscription_preferences attributeA key-value pair that you associate with a person or an object—like a person’s name, the date they were created in your workspace, or a company’s billing date etc. Use attributes to target people and personalize messages. Attributes are analogous to traits in Data Pipelines.. Each topic in the attribute is numbered, based on the ID that you see in the UI—topic_1 corresponds to ID 1 in the left-column in your Subscription Center setup page. We set subscription preferences by topic ID rather than the topic Name, so that you can change the name of a topic without affecting your audience’s preferences. For each topic, true means that a person is subscribed to a topic; false means they’re unsubscribed.
You’ll set this attribute—either through the API, a CSV upload, a Create or Update Person action, or Database sync—to apply preferences to a person.
{
   "cio_subscription_preferences": {
      "topics": {
         "topic_1": true,
         "topic_2": false
      }
   }
}
Check your payload
Applying subscription preferences incorrectly prevents us from observing your audience’s preferences, and can result in extra, misapplied attributes that clutter your workspace.
Migrate subscription preferences
There are plenty of ways to map subscription preferences. In this case, we’re using a campaign, but you could also use our API, upload a CSV, etc.
Before you start this process, we recommend that you:
- Create your topics
- Apply topics to your campaigns and broadcasts
- Figure out all the places where you’ll need to update subscription preferences. If you let your audience set their subscription preferences when they sign up, or inside your mobile apps, etc, you’ll want to make sure that you update those places to use Customer.io’s subscription center attributes as well.
Before you begin: relate preferences to topics
In Customer.io, we store subscription preferences by number (incremental, beginning at 1), so that changing the name of a preference doesn’t cause cascading changes to your audience. But that means that you’ll need to map your previous preference attributes to your new topic number.
So, if your attribute was previously called basketball and your first topic, that tells you that you’ll map your audience’s basketball preference to cio_subscription_preferences.topics.topic_1.
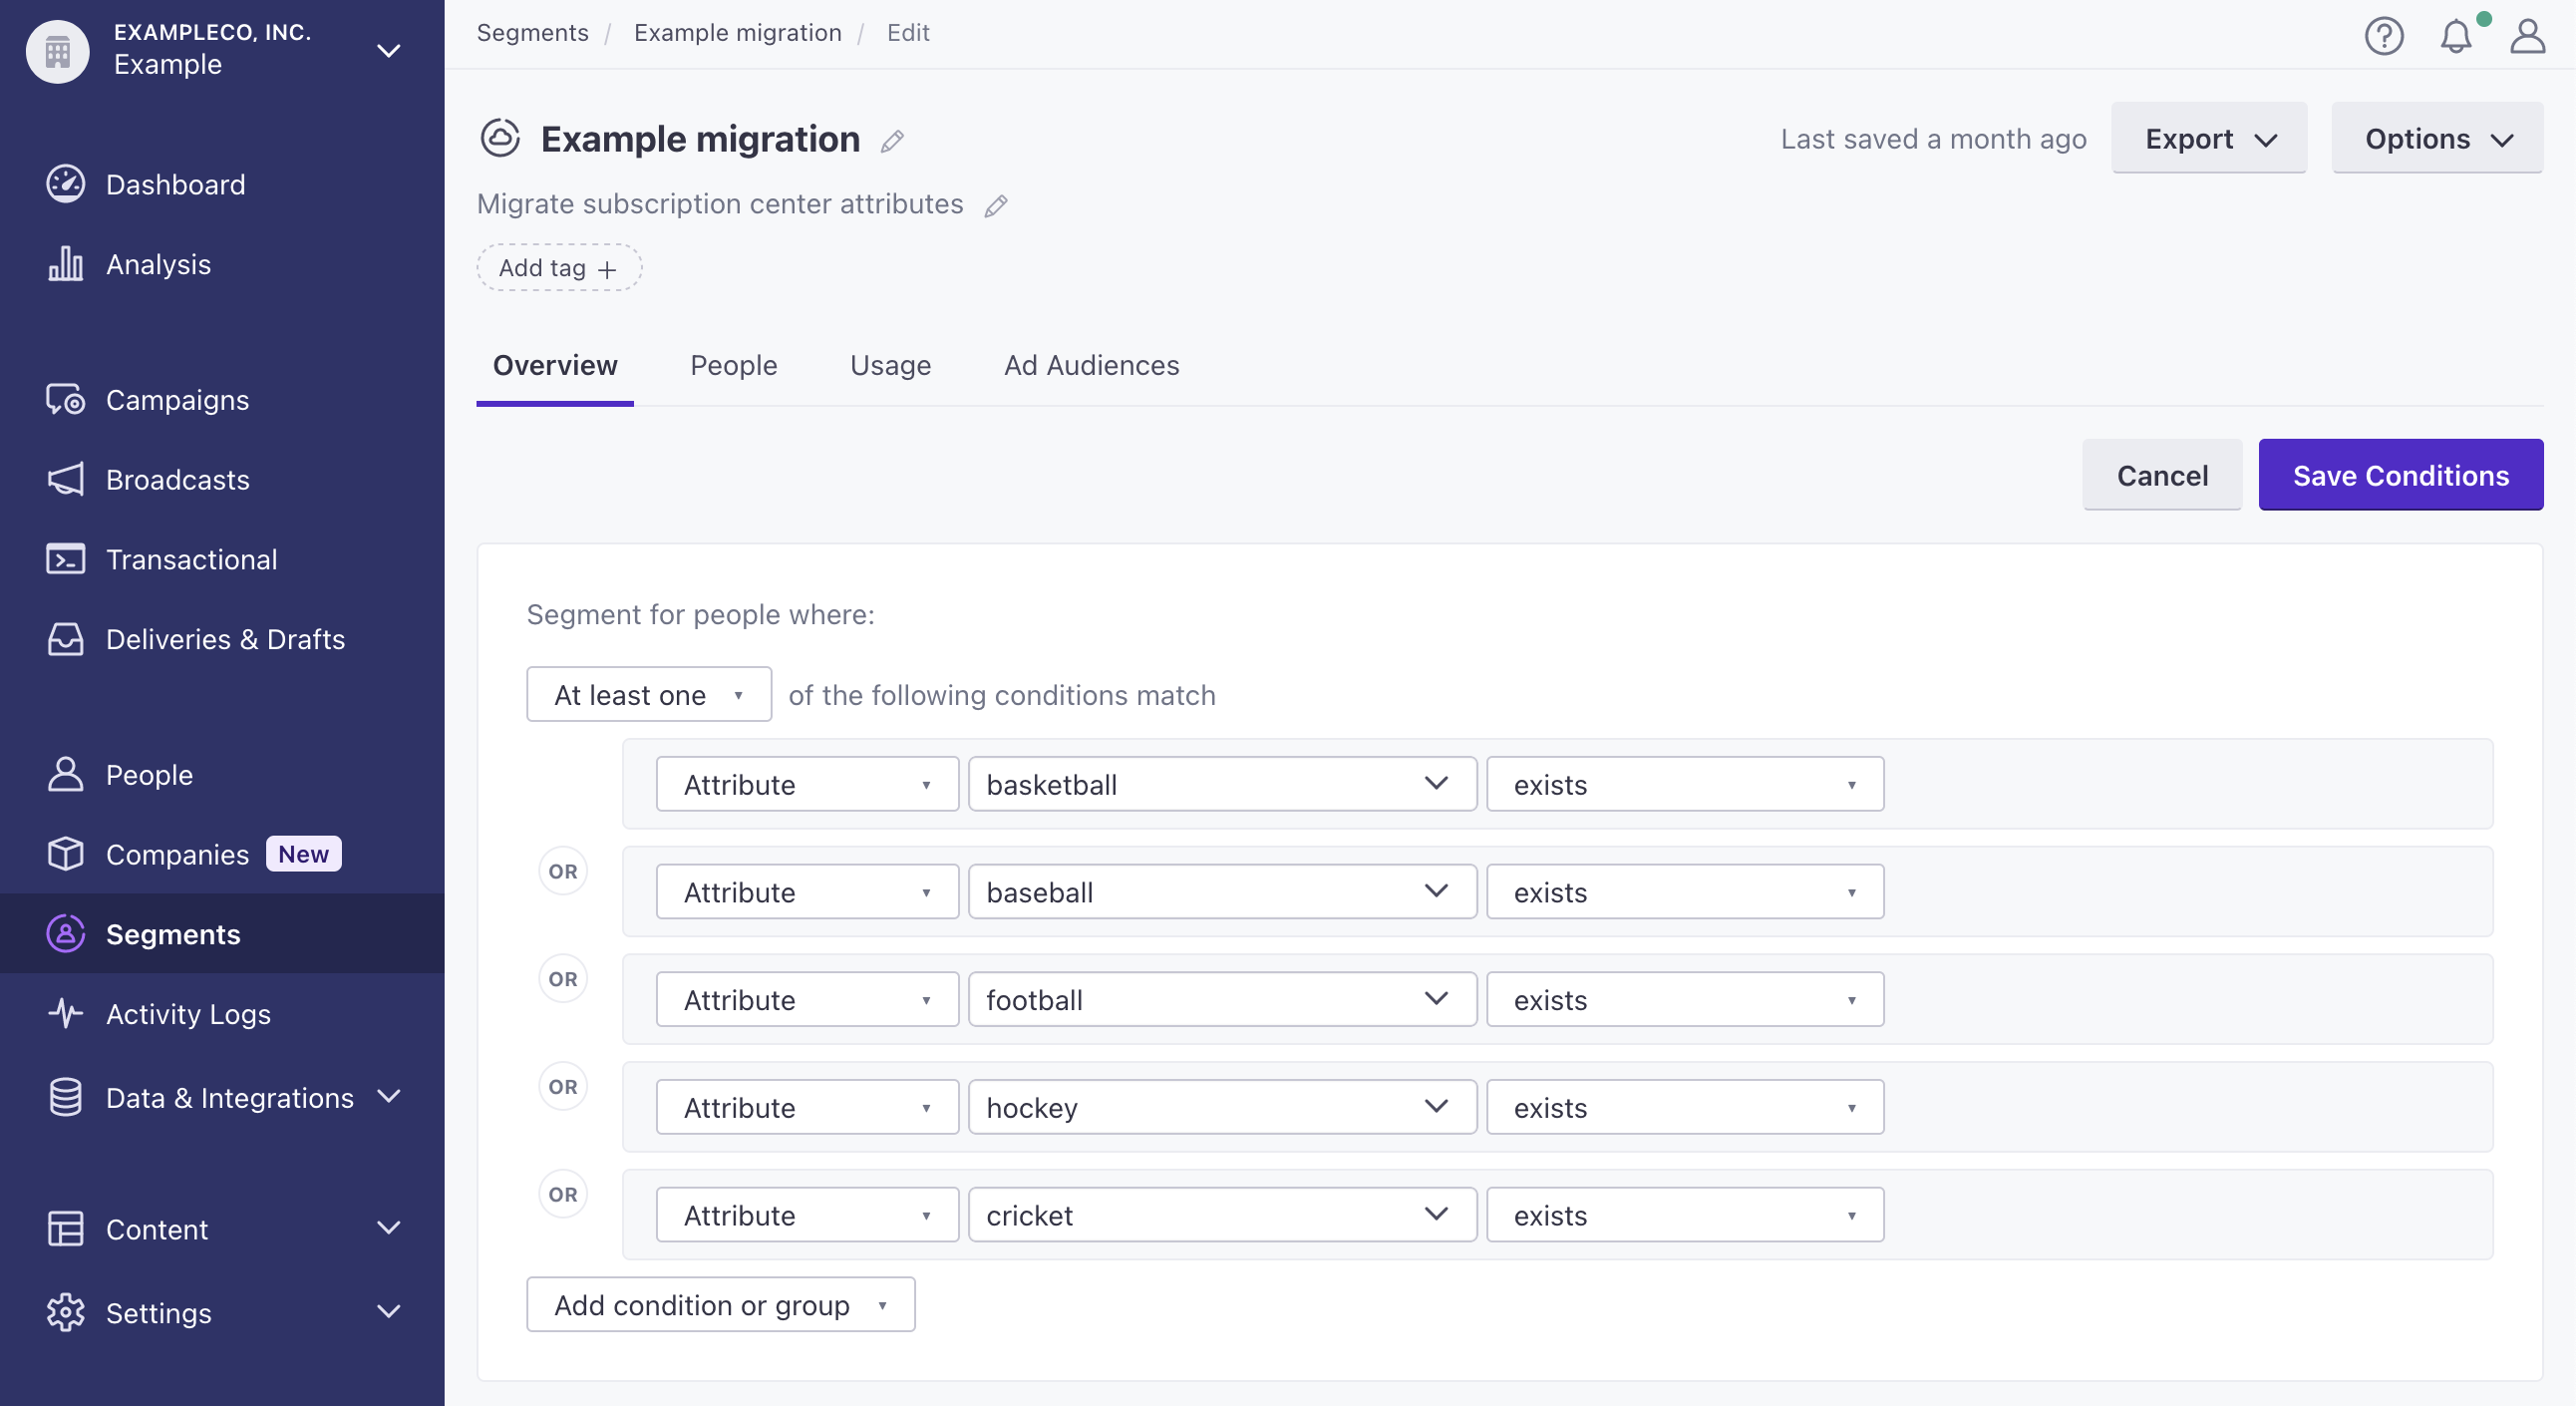
Create a segment
In this process, we assume that you previously stored your audience’s preferences as individual attributes, but the same basic process applies if you previously stored preferences as an object, array, etc.
- Go to Segments and click Create Segment.
- Set a Name and Description for your segment, and then click Create Data-driven Segment.
- Set up your campaign so At least one of the following conditions match. This ensures that people with any preference join your segment.
- Add conditions where each “preference” attribute exists.
- Click Save Changes.
Now your’e ready to set up a campaign to move your preference attributes to the new cio_subscription_preferences attribute.
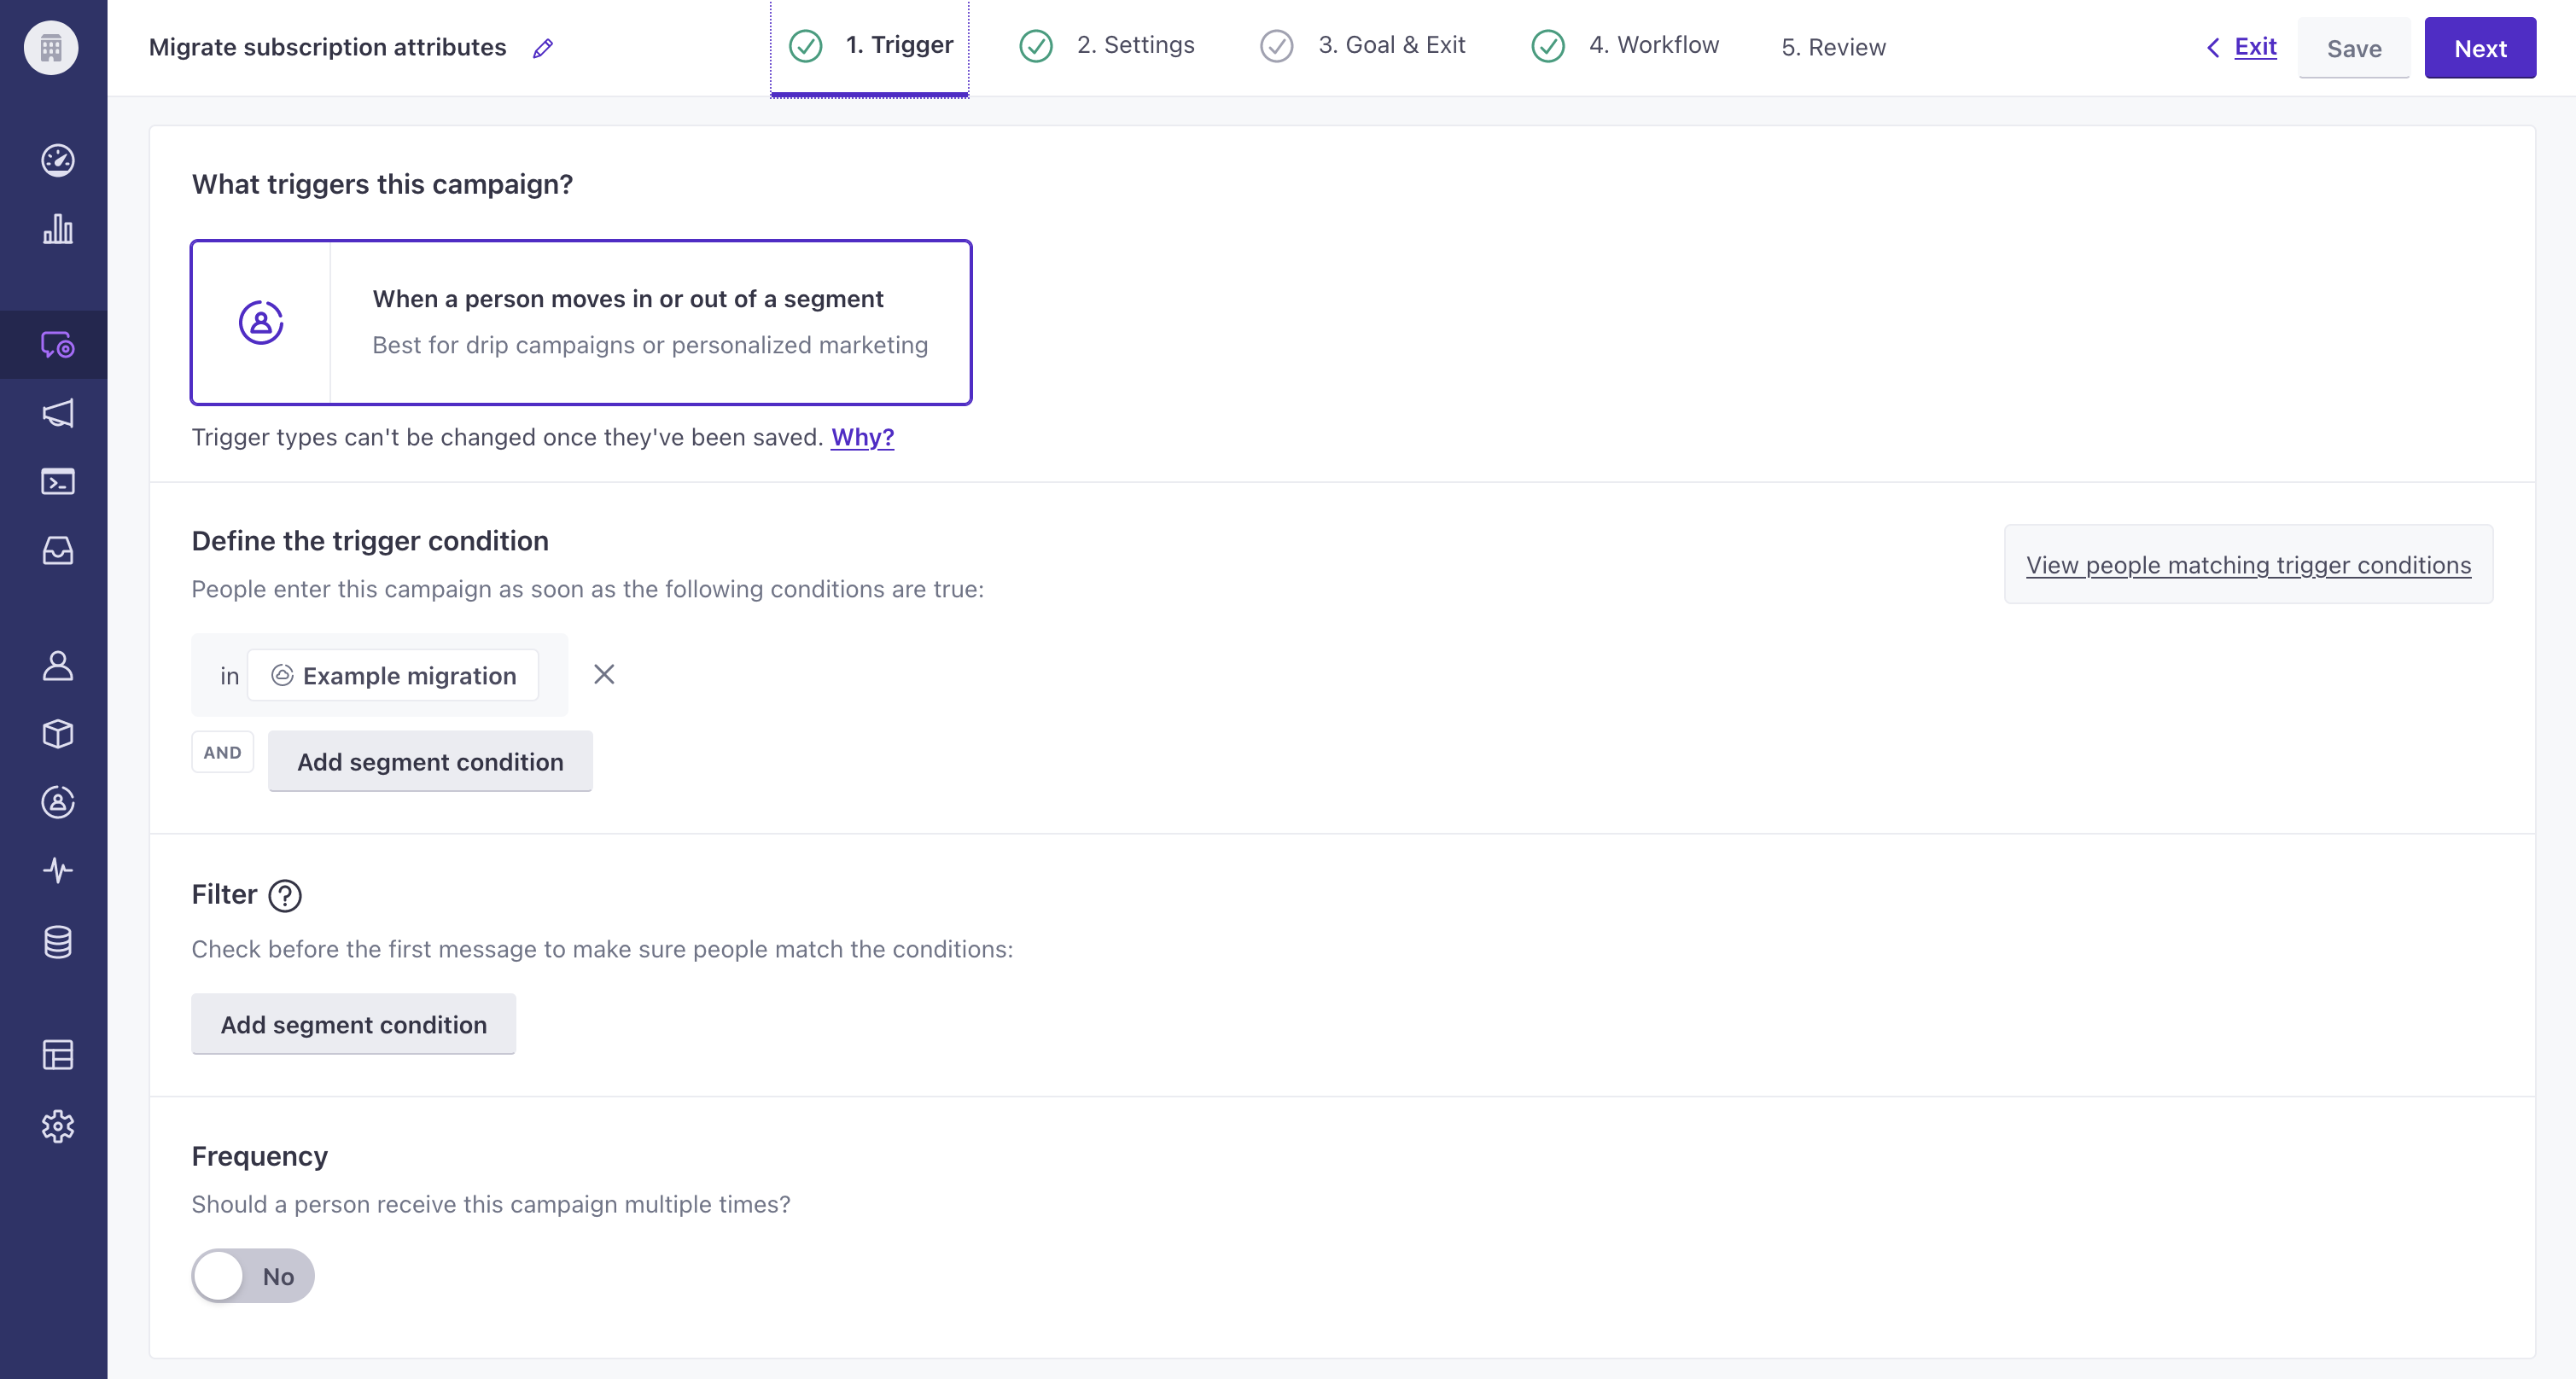
Create your migration campaign
This is a very short campaign with one step that simply sets your audience’s preferences. We’ll use the segmentA group of people who match a series of conditions. People enter and exit the segment automatically when they match or stop matching conditions. that you created as the trigger. And then we’ll map your previous migration preferences to attributes.
Go to Campaigns and click Create Campaign.
Set a Name and Description for your campaign, and then click Create Campaign.
Select When a person moves in or out of a segment—this lets us use the segment we created in previous steps as the trigger and audience for the campaign.
Under Define the trigger condition, click Add segment condition and select the segment you created. Click Save and Next.
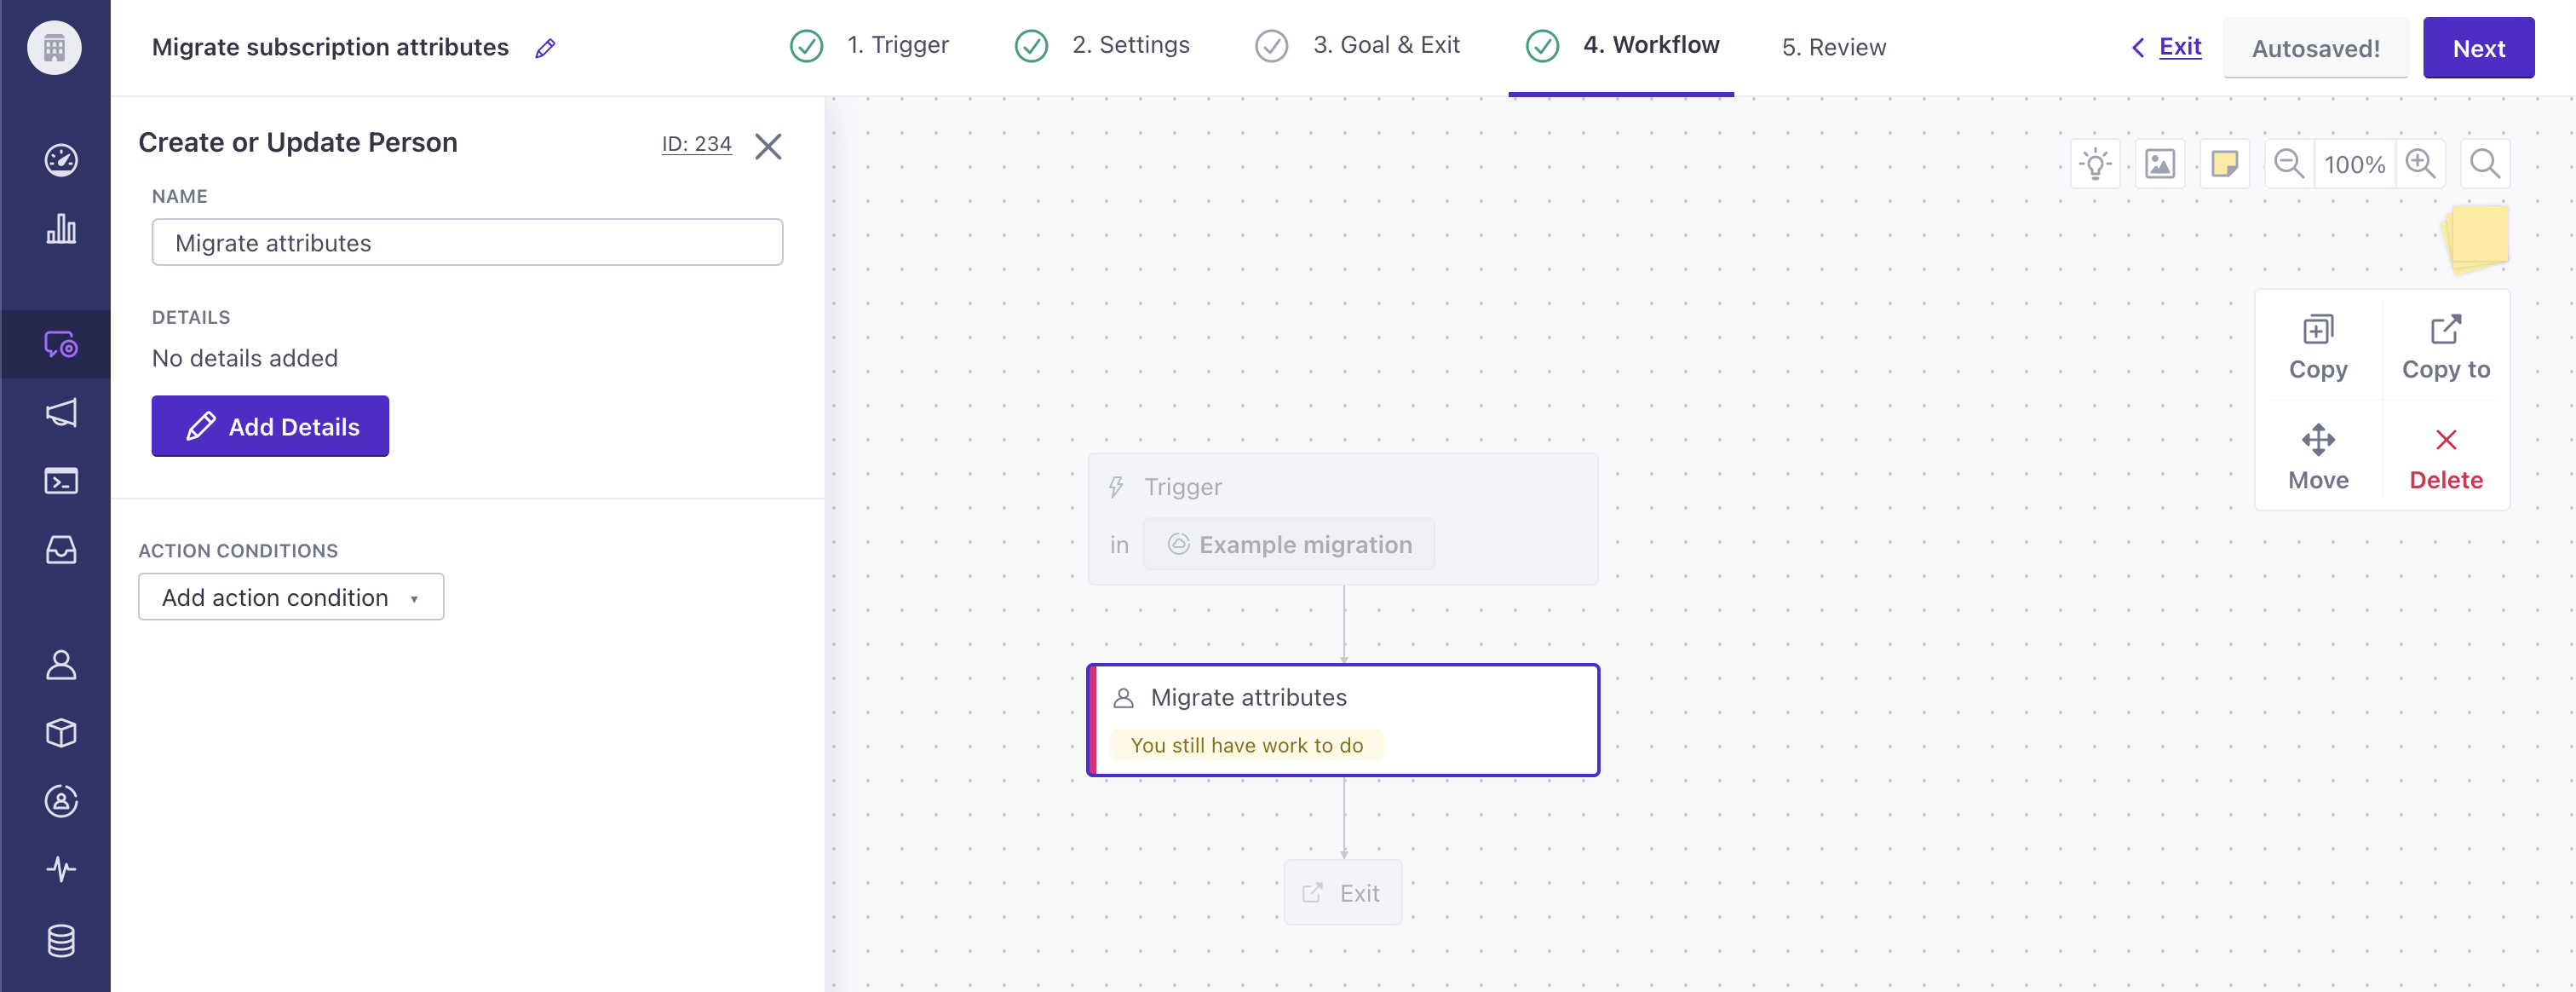
In your workflow, add a Create or Update Person action, select it, and click Add Details.
Set subscription preferences via JavaScript.
The Attribute is
cio_subscription_preferences.The Value is JavaScript. Don’t worry if you don’t know JavaScript; we’ve provided an example below!
In the final box, add JavaScript to map your data to the subscription preference attribute. In our example, we check if the baseball and basketball attributes exist. Since these attributes are boolean, we can map the value directly to the new subscription preference, if they exist; otherwise, we assume that a person isn’t subscribed to the corresponding topic (
false). Be sure to include mappings to all topics because this method does NOT preserve existing preferences for unspecified topics. Those would revert back to the default opt-in/out status.return { topics: { topic_1: customer.baseball ? customer.baseball : false, topic_2: customer.basketball ? customer.basketball : false } }
Add a line for each topic you want to set:
The Attribute is
cio_subscription_preferences.topics.topic_<id>where id is the system-generated id for the topic name in the subscription center.The Value is JavaScript.
In the final box, enter JavaScript to return the preference value from an attribute or a default if the attribute doesn’t exist. This method updates only the specified topic preferences and preserves existing preferences for unspecified topics.
return customer.<attribute_name> ?? <boolean>;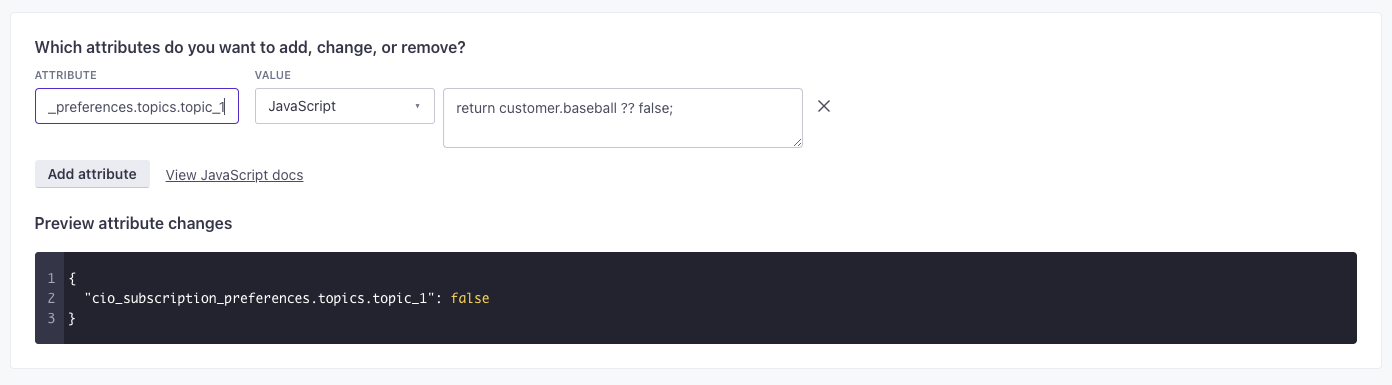
(Optional) Delete the attribute that you’re migrating from. After we apply the
baseballattribute totopic_<x>, we probably don’t need to keep it around!When you’ve added all of your attributes click Save and start your campaign.
Update subscription preferences via the API
For each person in your workspace, you can set subscription attributes using the identify action in our API. Your payload changes based on whether you use our v1 or v2 APIs, but we’ve posted examples of both below.
In order to update some preferences, while preserving those set for other topics, use JSON dot notation "cio_subscription_preferences.topics.topic_<topic ID>":<boolean>.
Use the v2 API to batch changes
The v2 API supports a /batch endpoint that lets you send changes for multiple people in a single request.
https://track.customer.io/api/v2/batch

{
  "batch": [
    {
      "type": "person",
      "identifiers": {
        "email": "cool.person@example.com"
      },
      "action": "identify",
      "attributes": {
        "cio_subscription_preferences": {
          "topics": {
            "topic_1": true
          }
        }
      }
    }
  ]
}
https://track.customer.io/api/v1/customers/cool.person@example.com

{
  "cio_subscription_preferences": {
    "topics": {
      "topic_1": true
    }
  }
}
Set subscription preferences using the web SDK
If you use the JavaScript snippet on your website, you can set subscription preferences with the identify function. You might want to do this if you let people set their subscription preferences as a part of your signup flow.
_cio.identify({
  email: "cool.person@example.com",
  first_name: 'cool',
  last_name: 'person',
  cio_subscription_preferences: {
    "topics": {
      "topic_1": true,
      "topic_2": false
    }
  }
})
Upload subscription preferences via CSV
You can set some or all subscription topic preferences for people by importing a CSV in the People tab.
Set one or more topic preferences for a person
You can use this method to update any and all subscription preferences for people without overwriting preferences for topics not specified in the CSV.
Add each subscription center topic name you want to set as its own column header. Upon upload, you’ll map each header to the attribute cio_subscription_preferences.topics.topic_<topic ID> where the topic ID corresponds to the topic name. You can find this on your subscription center landing page or by retrieving subscription center topics in our App API.
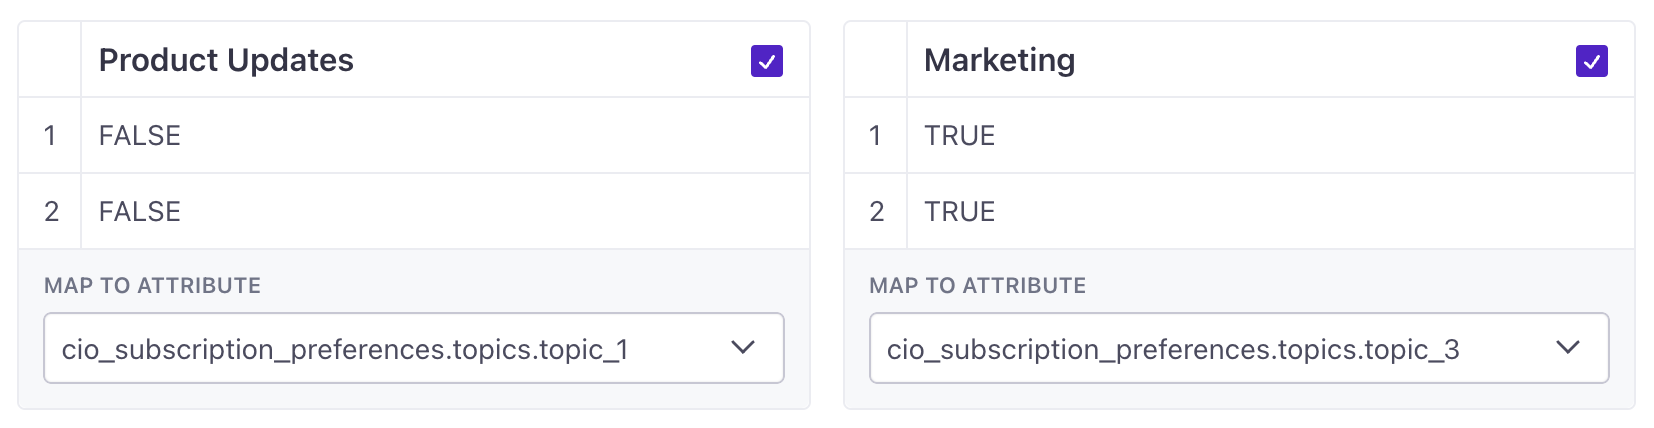
After you complete the import, you’ll see that only the topic preferences you specified in the CSV show changes on the person’s profile.
Before uploading, another option is to add a column header that already matches the JSON dot notation above. When you go to map fields, the correct attribute name automatically populates.
Set all topic preferences for a person
You can use this method to update ALL topic preferences per person, not a selection of topic preferences.
Include every topic and value per person
If you do not include all topic preferences for each person using this method, the person’s preferences that are not specified in the import will be overwritten to match the default opt-in/out status of the topic.
You can import subscription preferences for a person by adding a column header cio_subscription_preferences and including the same JSON structure that our API expects. The contents of this column are topics objects, as follows:
email,first_name,cio_subscription_preferences
person@example.com,person,{"topics":{"topic_1":true,"topic_2":false}}
another.person@example.com,another,{"topics":{"topic_1":true,"topic_2":true}}
See this spreadsheet for an example.